Hi @jdepena,
I’m pleased you managed to get it working. With cellular connections there are a number of reasons why the speed isn’t what you would expect. One of our partners has published this document > Here < which explains how to test / improve the available bandwidth using cellular connections.
The Peplink engineers have updated the testing tools since the document was written, see below for the updates, available from Firmware 7.1.0 (both devices need to be running this firmware or newer).
From the Dashboard on the HD4, click the “Status” button on the PepVPN with SpeedFusion section:-
From the next screen, select the “PepVPN Performance Analyser” button
Select the PepVPN Test

Tick the box “Show remote connections”
Using this tool you can run the tests multiple times turning each cellular connection on / off - please note though, turning off the connection for the test means that the cellular modem will NOT be used for any “live” traffic either. If you forget to turn them back on after the test, the connections will be automatically enabled after 15 minutes.
Once you have identified the best download / upload combination you can edit the profile via InControl (for others reading this who have manually configured the SpeedFusion Tunnel, these settings can be amended via the SpeedFusion Profile on the device).
For this scenario, I am going to assume that using my WAN2 and WAN4 were giving me the best download performance, whilst WAN 3 and WAN 4 give me the best upload performance.
Using InControl, Edit the profile
Place a tick in the “Show Advanced Settings” box and click Next

Click Next
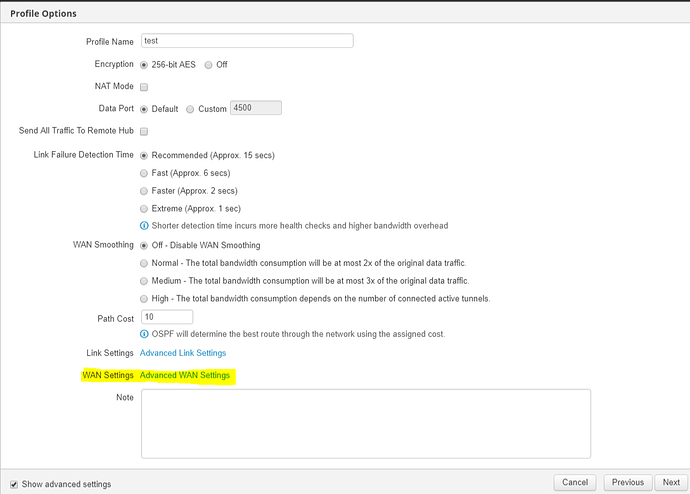
On the Profile Options screen, with “show Advanced Options” still ticked, click on the “Advanced WAN Settings”
Place a tick next to the device to modify - in this case, the HD4 and then click “Modify WAN Settings”
Tick the box “Show advanced settings”
I have changed the priority for other connections to 2 - so that in the event that my preferred connections fail, the device will use any of the healthy connections with priority 2.
Once you have finished modifying the settings, click Save - once back at the InControl configuration, click the “Save Changes” button to implement the preferences selected.
I hope this helps,
Steve


